Current thread: Mythic forums > Strategy & Advice > Tutorial / Walkthrough
|
| Author | Message |
Legion
12/10/2011 2:21:50 PM | I have decided to make a series of posts here as a sort of walkthrough for players old and new alike. The purpose is to:
1. Illustrate the first few Clan Days of a successful clan.
2. Teach the basics of game mechanics and systems.
3. Disseminate adventuring strategies and tactics for rapidly building a successful clan.
I'll post each clan day as a new thread. Feel free to comment. |
Legion
12/10/2011 2:25:13 PM | Cimmeria Clan date: year 0 day 0 Clan members: 0 Clan gold: 0.000
Cimmeria has been founded! Clicking the "create character" button creates my founder and leader. He is a lawful-evil human with the following attributes:
strength 13
dexterity 14
constitution 9
intelligence 12
willpower 16
charisma 9
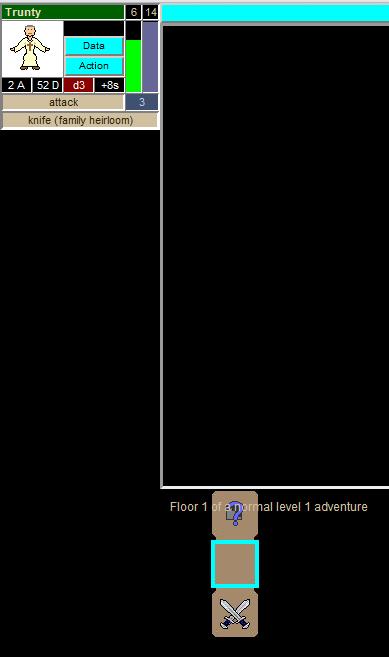
I have a lot of great options for classes, but I will take my own advice, which you see during multiple clan creation screens, and start with a cleric. Hopefully he will have the magic: life skill option. Clicking cleric gives him a name, Trunty, and fills in most of the character screen.
Unfortunately, Trunty cannot afford a skill in life magic! That is ok, we'll make the best of it. He starts with 7 hit points (representing how much damage he can take before dying) and 14 spell points (spell-casting capacity). Trunty has 20 skill points, and now is the time to choose skills. Magic: life is listed, but at 42 skill points it is unavailable. Instead I can choose between light weapons for 5 skill points or mental aptitude for 18. Both of these are general skills, meaning they confer no direct benefits but rather open up additional skill choices for future selection. I pick light weapons and see the following message:
You have learned light weapons level 1.
Your proficiency in these related skills has changed:
-6.38% light weapons
You may now learn weapons: sword
You may now learn weapons: spear
You may now learn weapons: flail
Unfortunately none of the new skills are affordable with my 15 remaining skill points. My only option is to choose light weapons level 2, which I pick for 10 skill points leaving me with 5 that I will save for next level. Light weapons: 2 opens up "knife" and "axe" as additional weapon choices. Weapon skills offer huge benefits and are essential for higher level characters, so even though I have not materially improved this character with his initial skills, I have opened the door for future development.
The last thing to do before leaving this screen is to equip any starting equipment. Trunty has one family heirloom, a knife, so I click on it to equip it. It gives him an extra HP! He is now ready for action!
|
Legion
12/10/2011 2:38:01 PM | I want to jump right in to adventuring without messing around with understanding all the numbers on character page or the details of the people pages. I read on the main page that random adventures give substantially higher rewards anyway, so I just click "random adventure" to see what happens.
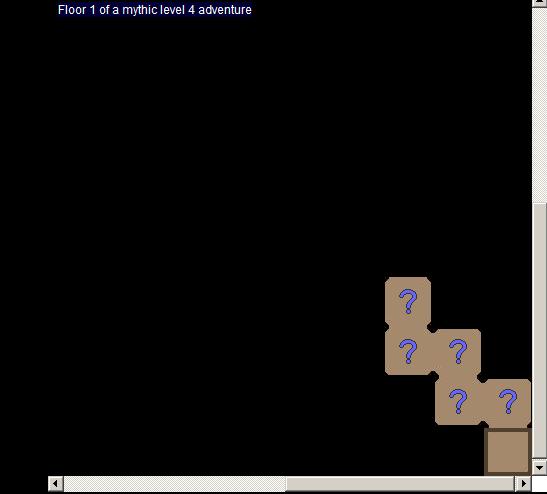
The adventure screen.
I see that I am starting my first adventure, Floor 1 of a mythic level 4 adventure. Oh no! A mythic adventure with a solo character and no equipment other than a newbie knife is almost certain death. It would probably be smart to flee right now and start again, but I will explore a little first. After all, I am a crafty veteran player with the confidence that I'll recognize a dangerous encounter if I see one and be able to flee in time to save Trunty. If not, its ok, it is always easy to start over.
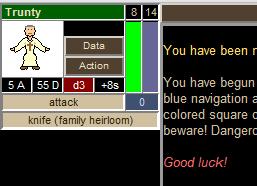
Besides, Trunty looks pretty tough. 5A means he has an attack bonus of 5%, and 55D is a respectable defense for an unarmored character. His real strength is the speed and damage of his attack: +8s means he will often attack twice a round and d3 means he will to between 1 and 3 points of damage each time he hits an opponent. Trunty is more than a match for most low level monsters. Of course, he may face groups of monsters, and that will be scary!
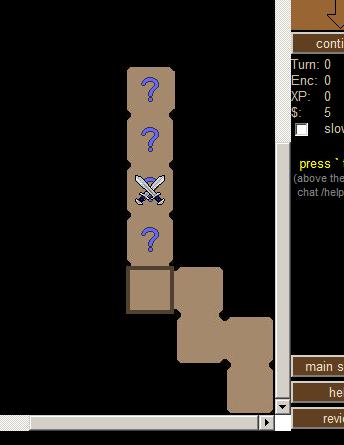
To start exploring this map, I check to make sure "NumLock" is off since my preferred navigation method is using the numeric keypad. Some players use the arrow keys, while others click the blue navigation arrows at the right edge of the map. Me, I press "8" on the number pad (the "up arrow") and get the following message:
Trunty's group moves north and has 4 MP remaining.
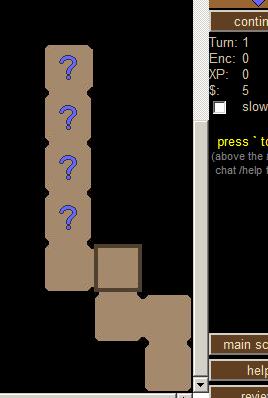
That is plenty of MP (movement points). I will be careful to never use my final MP moving into an unknown square. The reason is that when I see new territory I want to always have MP left over in case a monster is discovered that I do not wish to engage. Saving MP for retreating is absolutely essential if you want to avoid accidentally stumbling into a murderous group of monsters! I use 3 more MP moving west (W), then N and W again. I'm down to 1 MP remaining and my map looks like this:
Monsters! In the top-right corner of the page it tells me what I see: 2 gnomes.

2 gnomes might be killable, but might be too hard for me. The only way to know is to walk up next to them and view their combat stats. But with only 1 MP left, if I move up next to them now I will be stuck there, so I must wait until next turn. I retreat back the the ease with my final MP and click continue to end my first turn.
|
Legion
12/10/2011 3:04:45 PM | Starting my second turn, I have my full compliment of 5 MP available. If you ever want to check your MP available, you can click the circular arrows in the middle of the navigation panel or, as I prefer, press "5" in the center of the number pad. I move W,N to come alongside the gnomes:
Now I can see what I'm up against, and with enough MP left (3) to be able to move to safety if it isn't a fight I want to start. I examine the gnomes in detail:

Wow! Those are some tough gnomes! The first one is no real threat. In fact, Trunty would make fast work of him. But the second one, with the thin staff, does a whopping d6 damage. He could kill Trunty in 2 hits, or one critical hit if he was lucky. That gnome only has 4 hp and I do have one big advantage over him: weapon range. Staves are poor weapons for same-square fighting and knives are great at range 0. If that gnome were alone I might risk a battle, hoping to kill him before he hit me. But with 2 of them there, I feel like its just a little bit too much to ask of our young hero Trunty. This adventure is too hard, and so I retreat back around my corner. To flee from an adventure, click the "action" button or the character icon of the character in question (Trunty, in this case, of course). In this case, pick "flee."
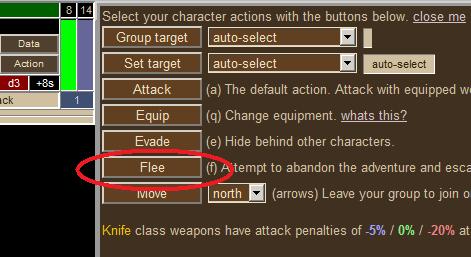
Notice how I moved out of sight of the gnomes before fleeing! If I tried to run while standing next to them, they would be able to attack me, but here behind the corner I should be able to flee safely. I click "continue" again, getting the following message:
Trunty tries to flee [42%]. Trunty cannot escape.
Thats ok. On my 3rd turn I move SWS to get as far from the gnomes as possible, to protect against the chance that they happen to wander around the first corner. Clicking continue again, my adventure is over!
I see that I earned no experience and no treasure. Of course not: I fled for dear life the moment I saw danger! One of the most important players skills in mythic warfare is to recognize which fights will be easy and which will not, and avoid any that look too dangerous. I click "continue" to return home and officially end Trunty's first adventure. It was unsuccessful, but at least he lived to fight another day! |
Legion
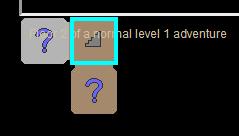
12/10/2011 3:14:50 PM | Trunty wants to try another adventure, so I click "random" again from the main page. The screen loads like this:
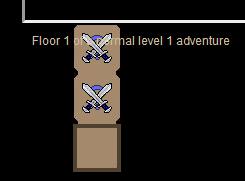
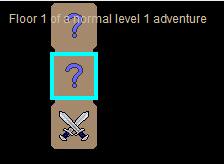
Oh no! This is a horrible start. Two monster groups are in line-of-sight (LOS) right from the start, with nowhere to run and hide. These are the rare adventure starts that can lead to character death. Trunty has few options here: flee or fight.
The saving grace is that this is "only" a normal level 1 adventure. That means these two encounters are probably all I'm dealing with, and they are much easier encounters than the previous adventure. A level 4 adventure will often have groups of multiple monsters, but in a level 1 these solo-monster groups are the norm. I cannot see details of the gnome, but let's examine this rat carefully.
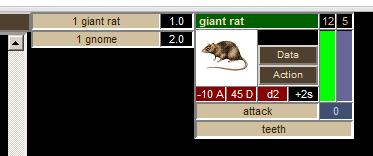
He has worse attack and defense scores than Trunty, which means in a 1-on-1 battle I will be hitting him more often than he hits me -- that is good. He is also slower, and does less damage. The rat has more hp (12 vs my 8) but all in all I feel like that is a fight I would win. The unknown, of course, is the gnome. I decide I'll take my chances for at least one round. If things look bad, I can always flee in the future. Without moving anywhere, I click "continue."


The rat moved forward, right on top of me. The gnome also advanced into the space the rat has stood before. If you fight the same turn you move, you often miss your attack, and this happened to the gnome. Looking at the messages, I see that the rat and Trunty both attacked, but the gnome did not. Notice that the gnome has a -2s speed score as well. Negative speed modifiers can result in missed actions, so between his move and his speed modifier, it is no surprise that the gnome did not attack this turn.
Before deciding what to do on turn 2, let me review the messages a bit more. Notice the parenthetical (14) before Trunty's attack and the (2) before the rat's attack. Those numbers are called initiative scores. They are calculated each turn by adding your speed modifier to a random number from 1 to 10. If the modified initiative is high enough (16+) a character will get two actions. If it is too low (0 or less) no action occurs.
I'll go into more detail here for those ready to learn some real nuts and bolts of combat. This information is crucial for decision making in difficult battles so even if you skip it now, come back and read this some day. Notice the "1" beneath the rat's hp/sp bars. That is his fatigue level. Everyone becomes fatigued as they move about and fight. In the initial screenshot the rat had -10A and 45D attack and defense values. Now, with one point of fatigue, these are reduced to -11A and 44D. Fatigue can play a major role in battle, so keep an eye on it! Trunty already has 2 points of fatigue and his attack and defense scores are reduced accordingly. Speed and damage will also drop as fatigue rises, but more slowly than the basic attack/defense scores.
The last thing to explain about battle (for now) is the hit percentages. Notice that Trunty had a 70% chance to hit the gnome (he could have attacked either monster, and chose the gnome). How is this calculated? Very simply. The base "to-hit" number is 100%. Subtract the gnome's defense (35) and add Trunty's attack rating of 5. Trunty shows an attack of 3 right now, but it was still 5 (before fatigue) when the round was resolved. The act of attacking generated a point of fatigue, as did dodging the subsequent rat attack. 100 (base to-hit) - 35 (target defense) + 5 (attack modifier) = 70%. Similary, you can see that the rat had a 35% to hit Trunty. 100 (base) - 55 (trunty's defense when the attack was made) -10 (rat's attack score at the time) = 35%.
So, what now? Can Trunty kill both the rat and the gnome? Should he attempt to flee now?
If I stand and fight, I have a decent shot at winning. I will hit the monsters more often and for more damage, although they have (at this point) 18 hp left while I only have 8. Factor in fatigue: fighting 2 against 1 I will be fatiguing more quickly, having 2 attacks to dodge each turn while one of the monsters will only have to dodge one attack and the other zero. Fatigue dissapation is based on constitution. Trunty has a 9 constitution which is ok, but not great. Fatigue will slowly pile up for him in a 2-on-1 situation so if Trunty doesn't win the fight quickly he will slowly lose his advantage. If I do choose to stand and fight I want to make sure I select the gnome as a target, since he is easier to hit and has less hp. The sooner I can get this battle to a 1-on-1 fight the better my chances of surviving.
However, there is another option too .. notice that one of the actions available to characters (see the screenshot above when he was fleeing for an example of Trunty's action panel) is to move. This option moves the character one square in lieu of attacking. Ah ha!
Sometimes battles are like chess matches and it pays to think several turns ahead. If I move N right now, they will both get a free attack on me. I could then move N again, giving them another free attack. But then I am in an unoccupied square past both monsters. This has two big benefits. First, at that point only one monster would attack at a time, since the rat would be out of range. Of course, the gnome might move right on top of me again, giving the rat room to move up also, negating this advantage. But before that happens, I could choose to disengage and simply move away from this area of the map. In a level 1 adventure, there are very rarely more than 2 encounters, so I can expect to have clear sailing to the treasure room and ultimately exit if I run past these monsters. Whats more, there might be room to maneuver beyond these monsters, allowing me to create 1-on-1 fighting situations that would give me a greater chance of victory. Is it worth giving each monster 2 free attacks to attain these advantages? The answer isn't obvious, but I feel that it is. In a battle it is far too easy for something to go wrong. One bad round where Trunty gets stunned or critically hit could turn the tables immediately against me. I would rather be in a situation where I had a clear path to the exit before fighting these monsters so that an unlucky round of battle will not be fatal. I select move N as my action and click continue.
The rat hit for 2 damage, while the gnome missed his action again. Not a great result. Whats more, Trunty has moved north out of his initial group (group 1) and created a new group (group 2) on the map. This is a bit confusing at first. What groups are we talking about? Well, all characters are in groups. Eventually Cimmeria will have dozens of characters on each adventure and they will be in multiple groups, occupying multiple squares on the map. Moving in battle will swap a character out of his current group and into another. In this case he was the last character to leave group 1, disbanding it. The square he entered had no character group in it yet, so a new group was formed, group 2. In order to see what is going on and continue, I have to click the blue "group 2" button on the top of the screen to set my active group to Trunty's new group. Alternatively I could press the "2" key. I press "2" and the screen updates:
Ok! Trunty is hurt, but look at the progress made! The gnome moved atop the rat in my old square. This is highly unusual. In fact, it shouldn't happen. But sometimes strange things occur and as players all we can do is make the best of them. In this case, the unusual behavior is to our advantage. Since Trunty's "group" is in an unoccupied square, it can freely move, and to the north I see stairs leading downward. I had been expecting this to be a two-turn process but since the gnomes moved out from under me, we're already "free" of this battle. Moving N and D brings us out of sight of the monsters and loads a new map:
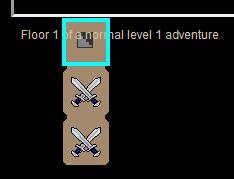
Look! The end of the adventure is in sight. I have 3 MP available so I will move SNW to explore the rest of the map and end my turn in the final room, which will always contain an exit, often contain treasure, and is a different color on the map.
Alas, there is no treasure, but there is an exit. I feel "safe" now, in the sense that I know I can freely exit the adventure without the uncertainty of attempting to flee. With this exit "in hand" I think I can risk some more combat. Hopefully Trunty can kill at least one of these monsters and earn some treasure and experience. I click "continue" to end this turn.
Now, let's figure out how to get that gnome and that rat, without risking our own skin! First I will move E, to the stairs. If the monsters had moved to the top of the stairs, they would be visible from here. Since they are not, I use my second MP to go up the stairs for a closer look.

Perfect. The gnome has moved north again and is right near the stairs. I feel like I can kill that gnome if I can fight him out of sight of the rat. How to do that? Just move back down the stairs, and wait. Eventually the gnome should wander north one more square and I'll see him, and fight him, from the adjacent square downstairs. Note that I do NOT want to fight him here, since he would eventually advance on top of me, with the two-fold problem of pinning Trunty's group in place and allowing the rat to advance and double-team me. So to end this turn, I move back down and click continue. |
Legion
12/10/2011 4:23:24 PM | Now what? We're at the bottom of the stairs and the gnome did not advance. The answer is simply: we wait. I click "continue" and nothing happens. I click it again and again, watching the turn counter climb. Eventually one of those monsters is bound to come into view. I click it again and again and finally, on turn 13, we get action!
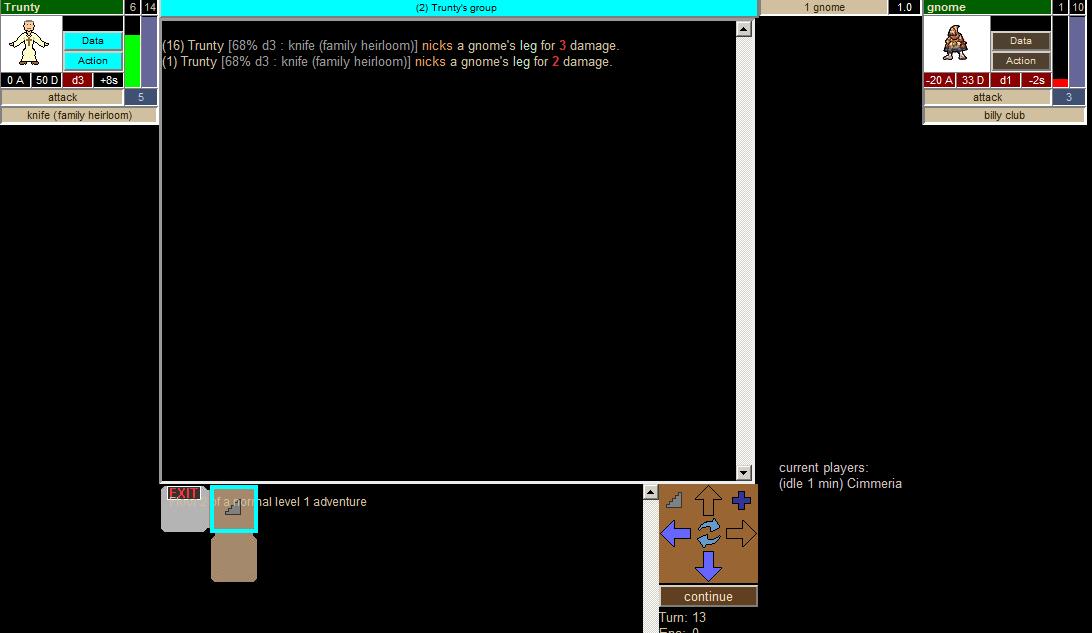
What a great turn! The poor unsuspecting gnome walked right into my trap. Trunty got two attacks while the gnome, not surprisingly (since he moved this turn) did not even attack once. Trunty hit both times and the gnome is almost dead.
It is time for another tactical choice. Should I stand here and keep fighting, or move one square west? Moving west is ordinarily my choice. It would move out of LOS. I would then wait for the gnome to move again. If he moved D (down) I'd expect a repeat of this turn: Trunty would attack, probably hit (killing the 1 hp gnome) and the gnome would probably miss his attack. The gnome might, however, move S instead, back away from the stairs. In that case, I would move back beneath the stairs and wait some more. However there is no guarantee, at that point, that the gnome would be the first to wander atop the staircase. It could be the rat. And I might not win a fight with the rat at this point, injured as I am. If that happened I would retreat back to the exit and hope that the rat did not come down the stairs, as it would force me to exit.
That is a lot of "what ifs" but its usually worth considering future turns before deciding what to do. In this case, I think there is a (very slim) chance that backing off would lead to a series of events culminating in exiting the adventure ahead of a battle with the rat. Instead, I could just stand here and fight the gnome. Its worse, tactically, when only considering the gnome, since he may not lose his action in an advancing move. It also carries a risk of its own that the gnome will descend to pin me here while the rat moves to the top of the stairs and they fight me simultaneously. But these risks are tiny, especially since I am almost certain to act before the gnome and I will very likely hit him, killing him. Weighing the two small risks against one another leads me to conclude I should fight here where I stand.
This was a lot of thinking for a very minor decision. Both choices carry very small risks and the consequences of either choice are almost equivalent. However the process is important. Every turn you will face choices with almost identical outcomes, but choosing poorly time after time will eventually take its toll. Good mythic warfare players seem to have a knack for always doing the right thing, while novice players often make a series of choices that in isolation seem to not matter much, but with an ultimate result of leading to a very untenable battle and then, invariably, death of a character. I click continue.
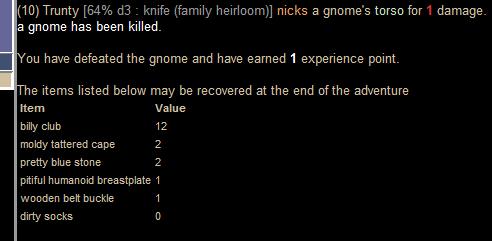
Hooray! Trunty has killed the gnome, and collected some treasure. This adventure is now an unqualified success. Experience and lots of loot, including a fine weapon (the billy club) that I will use in the future. Unfortunately you cannot use newfound equipment during an adventure, I will have to wait until he gets home to equip it. The real question is whether I should take my winnings and exit now, or get greedy and try to kill the rat too?
The rat has twice my hp (12 to 6). I will do more damage with each hit (d3, for an average of 2 hp per hit vs the rats d2, with an average of 1.5 hp per hit). I will also hit more often, somewhere around 60% to the rats 35% (remembering the rat's combat values from the very first turn when we could see them). There is a further factor I haven't mentioned. On the action panel (see screenshots above) it reminds me that knife class weapons, such as I'm using, have a -5% penalty to attack at close range. Close range is when you and your target share the same square. The fight with the rat will start at normal range because I will use the same tactic of standing beneath the stairs and letting him wander into range. I will even repeat that trick by backing away from the bottom of the stairs and letting him advance again. But ultimately, the rat will push me all the way into a corner, move on top of me, and we will finish the battle at close range where I will have a -5% penalty, bringing my to-hit chances (pre-fatigue) down to 60%. I am not considering fatigue because I expect both the rat and I to fatigue at roughly the same rate, giving no advantage to either of us. This might be optimistic: giant rats are pretty hardy folk, and his constitution is probably higher than 9, meaning my fatigue will creep upward faster than his.
What to do? My final choice has nothing at all to do with the rat, believe it or not.
It is tempting to start the rat fight. If things go well the first round, I could continue it, and if they go poorly I could take the exit. And winning the fight would be great: more treasure and a huge xp reward. Killing everything on the map gives bonus XP, and if you skip any monsters, you take a big hit. In fact, I'll get almost no xp if I don't kill the rat (about 1.8, compared to almost 9 if I kill the rat). 9 xp would be great .. it takes 100 xp to reach level 2. But I don't mind getting a trivial amount of xp from this adventure. I'll be getting treasure including a great weapon, meaning future adventures will be much easier. And the deciding factor: healing time.
I have 75% of my hp right now (6 out of 8). That is a relatively minor wound and it will heal quickly. If I fight the rat, even if I win easily I will probably get hurt. Healing from 50% hp can take a long time, and healing from less than 50% can take a really long time without magical healing, which I do not have. I'd rather exit now, heal quickly, and do another adventure with a better weapon. I'll also be able to use some of my treasure to recruit another character and with two of us adventuring we will really be able to crush these low level monsters. So even though its tempting to try fighting the rat to see how it goes this is a very easy choice for me to make. I move west and click the exit button in the bottom-right corner of the screen.
Before moving on to collect my rewards and end the clan day, I want to recap what happened today. I created my initial character and went on two adventures. By moving carefully and scouting the enemy I realized that the first adventure was too dangerous and so I fled without engaging the enemy. This second adventure may have been winnable by simply standing where I was and clicking continue until either the monsters were dead or I was. However I'm not the type of player to trust my luck to a proverbial coin flip; I might have won this adventure but that type of cavalier playing style will not get you far in a game as difficult and unforgiving as Mythic Warfare. Careless play only gets you so far, then you die and have to start over. That is fun, but I am playing to win here and you won't win for long by accident. So instead I took a calculated risk to run through the enemy encounters and locate the exit, then maneuvered into a position where I could kill the weaker monster without engaging the stronger one. Once I had gotten the most I could out of this adventure without undue risk, I ended it. I hope you can see why I made the choices I made. It is easy to say "Cimmeria was lucky" because I got away from my second adventure with a nice billy club as treasure and only lost 2 hp on my character. But it is no accident. If the monsters looked too hard I would have fled early and tried again, and I made a very cautious choice at the end to avoid a second battle with the rat. As I said before, Mythic Warfare is a series of often minor choices that add up over time. I took some calculated risks here and wound up leaving before the going got tough.
|
Legion
12/10/2011 5:10:00 PM | 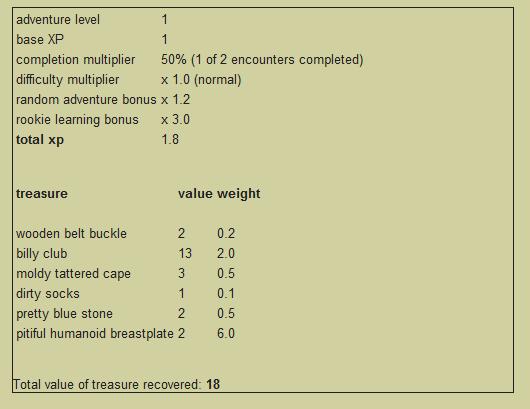
Take a look at the XP gained. Imagine I had killed the giant rat too. Base XP would be 2 instead of 1. The completion multiplier would have been 120%, since there is a 20% bonus for killing everything. So my total would have been 2 * 1.20 (completion bonus) * 1.2 (random bonus) * 3.0 (rookie bonus) = 8.64. So killing that rat would have really put me on my way to level 2. But that's ok for reasons explained above. And look at that treasure! That is a spectacular haul for one gnome. To equip these items, and sell unwanted ones, I click the link by Trunty to go to his character page.
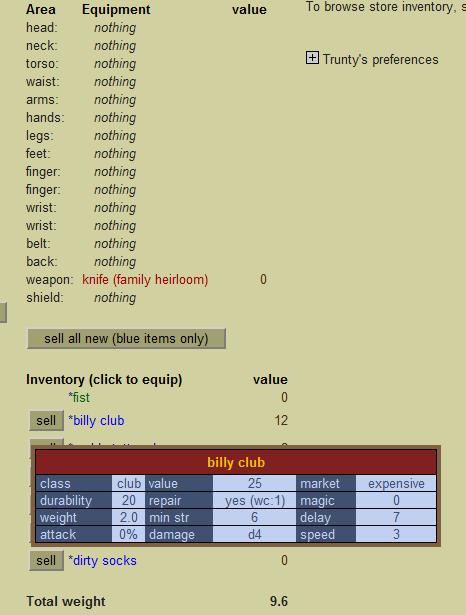
I equip the billy club, along with what armor I've found. The rest I sell.

There are a couple of things to note here. First is that the armor I'm wearing does hinder me a bit. My defense average is still just 55, but my attack bonus is only +3 instead of +5. Lets get some more details be hovering the mouse over the "attack bonus" and "defense avg" sections.
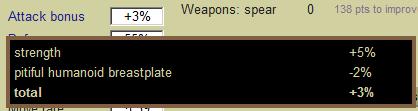
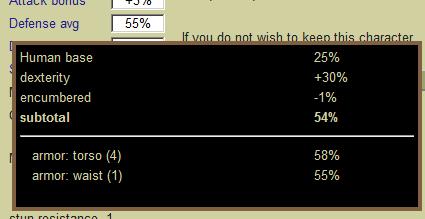
My torso has 58% armor, and the torso is the most commonly targeted location. However carrying all this weight, 9.1 lbs, does give me an encumberance penalty of -1% overall to my defense. Is this armor worth it? -2% to attack and -1% overall defense (the armor, after all, weighs 6.0 of that 9.1 lbs so most of that penalty is the fault of the breastplate) in exchange for 4% torso armor. Its a tough choice. Low level monsters usually have attack penalties, so a few armor points make a difference. Remember the attack that injured Trunty? Here it was:
It is no surprise that it hit the torso. 30% of all attacks target that location. That rat had a 36% chance of hitting, but with this armor it would be down to 33%, since my torso coverage would be improved from 55 to 58 (a 3 point improvement). That might not seem like much, but 36-to-33 is about a 10% difference and little things like this can add up. Is it worth my own attack suffering 2 points? Probably. My attacks were made in the 60%+ range, so losing 2 points there is not as big a deal. Dropping from 60 to 58 for example means I'd hit about 3% less often. Compared to the 10% less I'll be hit on torso attacks (which are 30% of all attacks) its really a wash. This choice doesn't matter much. In general, I like to take armor points where I can get them since less hitting by all combatants (including myself, sadly) will slow down battles and give me more rounds to move about, choose non-combat options like repositioning groups while under fire, and/or flee when needed. All things being equal, as they are here, I like being armored so I'll stick with it.
How about Trunty's weapon choice? The billy club has improved my damage to 1-5 (often expressed as d5) from 1-3 (or d3) with the knife. Put another way, my average damage has improved from 2 to 3 points per hit. My speed, however, is worse. I was +8s with that knife, and I'm down to +4.6 with the billy club. I'll never get an initiative above a 14 (remember, 1-10 + speed mod = initiative) with the billy club, so I'll never get multiple attacks per round like I did with the knife. Even worse, the club does not come with the bonus +1 hp that I got from wielding the knife. But still, a 50% boost to my average damage is a big deal, and more than makes up for the speed loss in my opinion. Another consideration is fatigue. Less attacks per turn means less fatigue buildup, which for a character with 9 constitution can be a concern. Overall the billy club seems like the best choice and I'll start my next adventure wielding it. I can always switch mid-adventure when I need to.
And what about the dirty socks? They do nothing for me, but they had no value to sell. A lot of items in Mythic Warfare give no benefit and are just for added atmosphere. I like to keep every slot of my inventory filled, for no particular reason, so I wear the dirty socks anyway.
I'm happy with Trunty's equipment and wish to save the 6 coins he has, so I click "continue" to return to the end-of-adventure screen, then "continue" again to officially end the adventure and return home.

When I return to the main screen I see a "hint" suggesting that I end the clan day. Great idea! I click "clan" from the menu bar to go to the clan page.
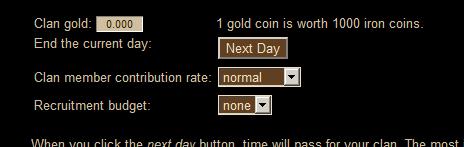
I'm happy with the "normal" contribution rate and without any clan gold, "none" is the only option available to me for recruitment. That's ok, with a new clan any recruit will be a tremendous addition to Cimmeria, even a "free recruit." I click next day.
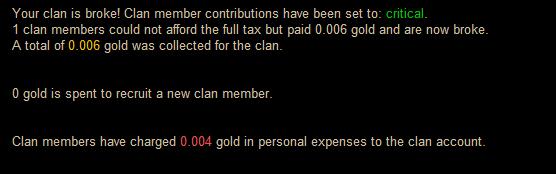
My clan day is now over. The 6 coins Trunty had were all contributed to the clan (the .006 gold .. each gold piece is worth 1000 iron coins), leaving him broke. No problem there -- that money went to the clan where it was needed. I recruited a new clan member for 0 gold, and spent .004 gold (4 of those 6 iron coins) on daily expenses. There is no message about healing, which is unfortunate. I'd been hoping Trunty would recover at least 1 of his lost hp, but he did not. But that's ok, it was still a good day. The clan account is up to .002 gold and we have a new recruit ready to join Cimmeria. Progress has been made!
|